

Introduction
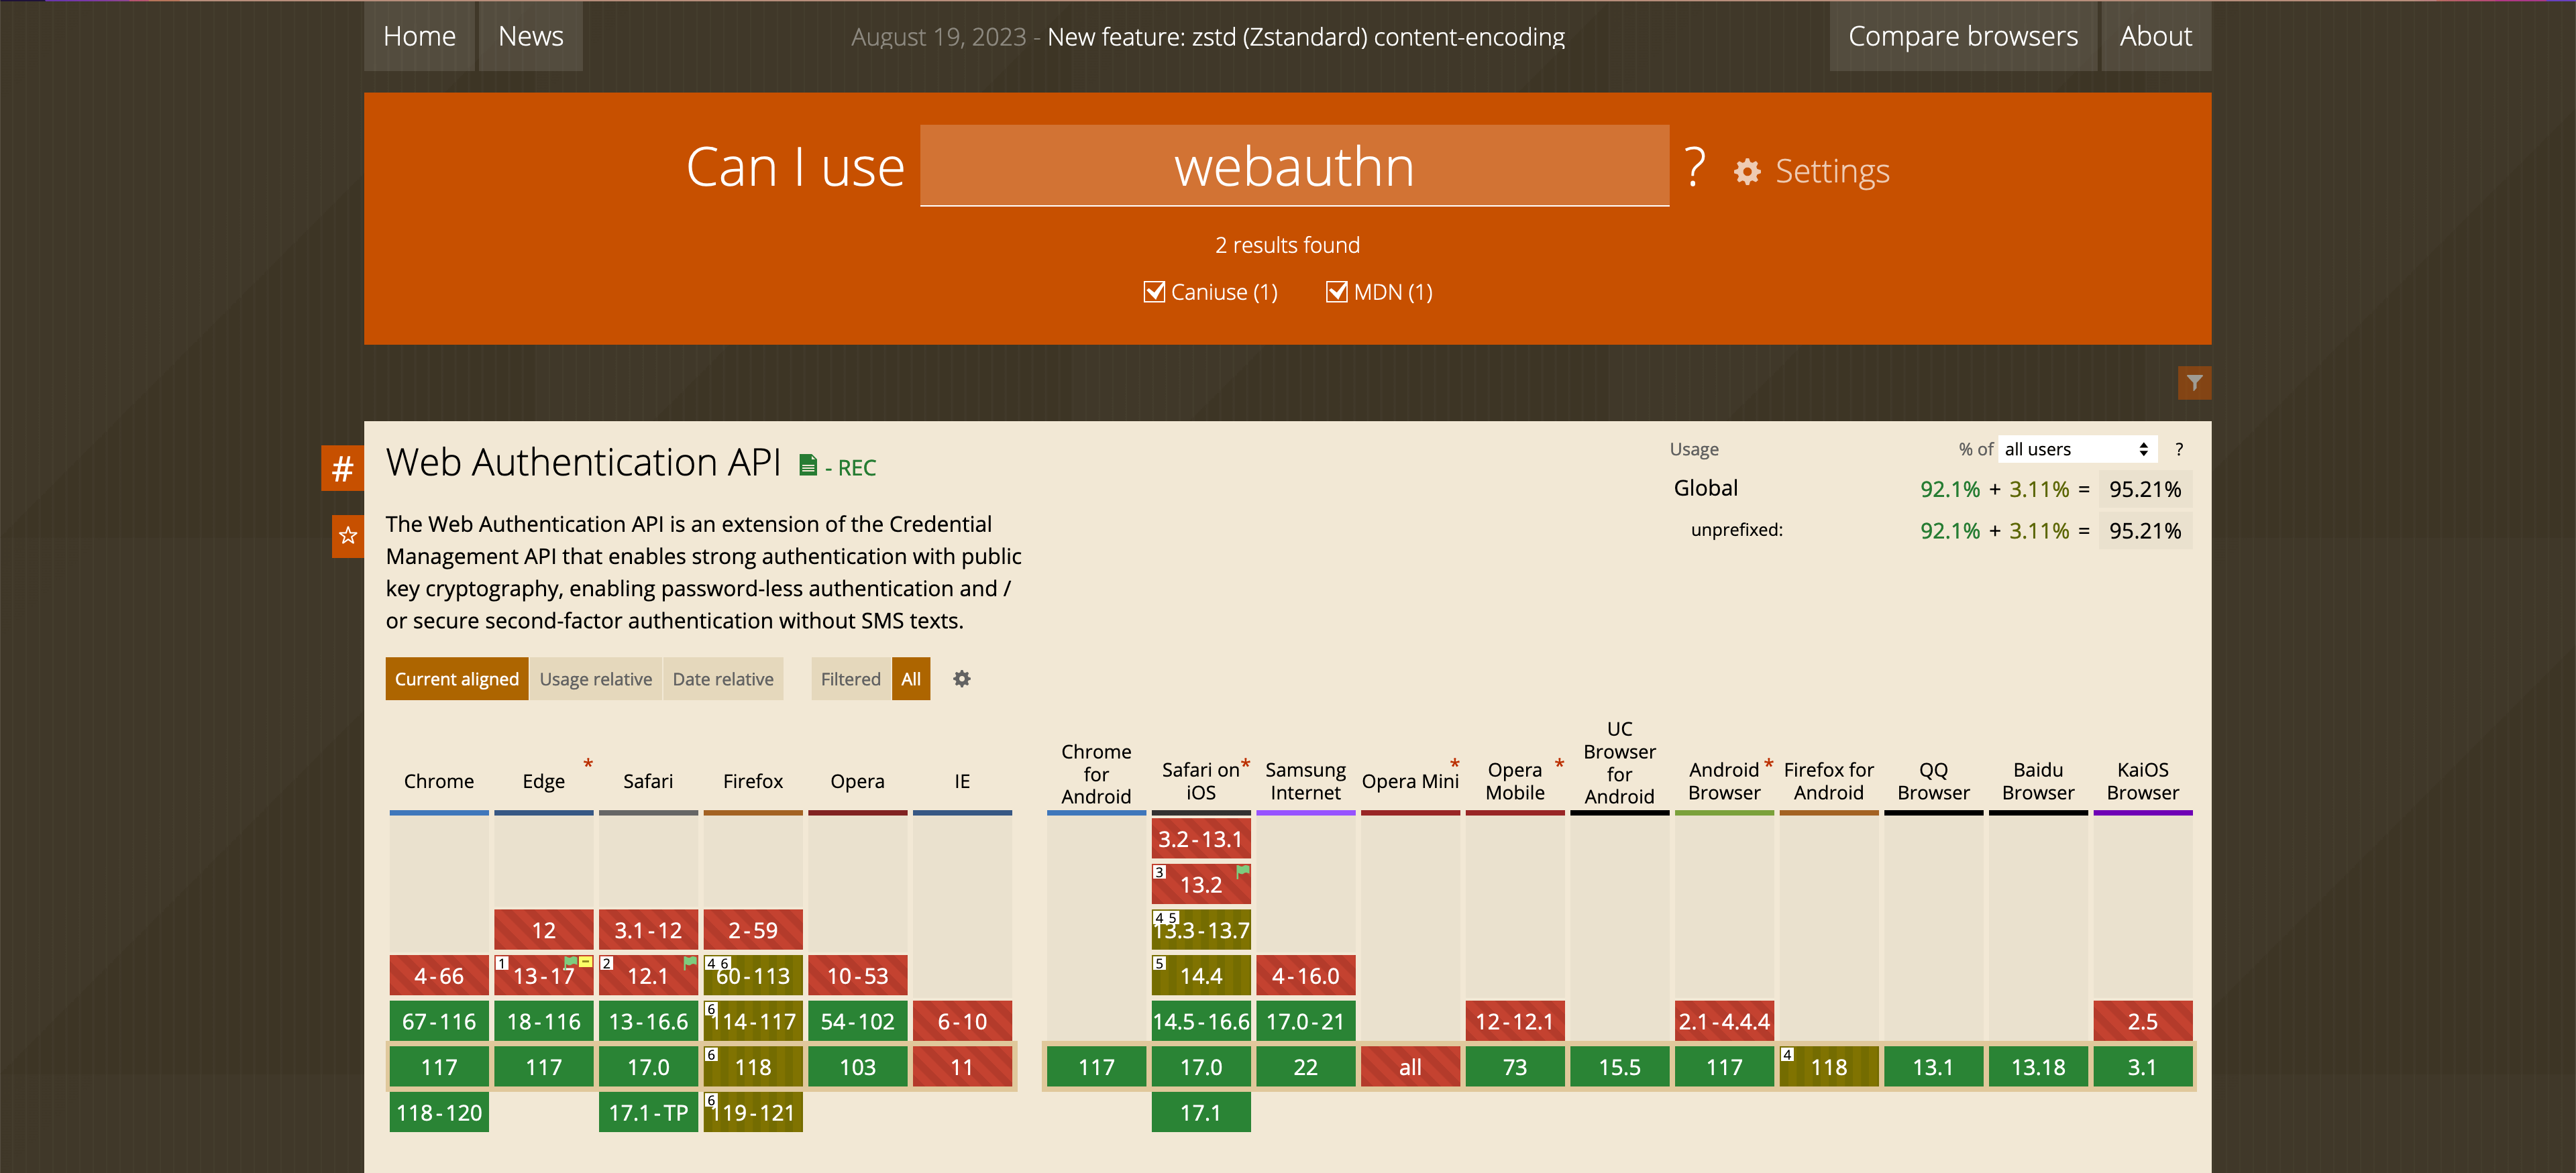
In this tutorial, we will learn more about the Web Authentication API (a.k.a. Webauthn) by building a simple app that uses Passkeys for authentication. Webauthn allows servers to register and authenticate users through the use of public key cryptography instead of a password. We will be using Express.js for this demo.
Caveat
At the time this article was first published, Webauthn is still an emerging technology. So while it is already supported in most major browsers, it only has partial support in Firefox because it does not yet cater to TouchID.
Scope
To keep the scope of the content manageable, we will only be focusing on the happy path of the implementation.
We will not be covering:
- security
- error handling
- form data validation, or
- any other authentication edge cases
Prerequisites
We will be using Docker in this tutorial, so to follow along, you will need to have Docker installed and running. You can head to their download page to find the version that suits your environment.
Setting up a new project
In the terminal, we can change into the directory where our projects are stored. In my case this would be the Sites folder, it may be different for you. We will create a new directory for our new project, and immediately change into it
| |
We will be using Docker for local development, so let’s create our necessary config files
| |
Now let’s open up our Dockerfile and add Node.js to our instructions. We will be installing Node.js in a container, so we do not need to have it install on our machine. On the next line, we will specify the path to our working directory. That’s enough to get us started for now.
| |
Opening up our docker-compose.yml file, we can add config for our first service called web, which will run on port 3000.
| |
We do not have a node_modules directory just yet, but let’s tell our .dockerignore file to ignore it along with any npm debugging logs
node_modules
npm-debug.log
And with that, we can head into our terminal and spin things up with following command. At this point, it will only install Node.js in our Docker container.
| |
Once the container is created and Node.js is installed, successfully, we can access the shell inside our Docker container by running the following command
| |
Just as a sanity check, let’s see if the correct version of Node.js has been installed in our container. If you get an output similar to v19.9.0, then all is right with the world.
| |
While still in the container, let’s initialise this project to use npm to handle our dependencies. We use the --yes flag to skip the setup wizard and give us a basic package.json file
| |
We will be using Express.js to give us web server functionality. So we can install that as a dependency
| |
Then we can create an index.js file to act as an entry point to our application
| |
We can head over to the Express.js documentation and copy over their hello world example into our index.js file. Then we will make some minor changes to it
| |
While still in the container, we can now spin up our barebones app by running the following command
| |
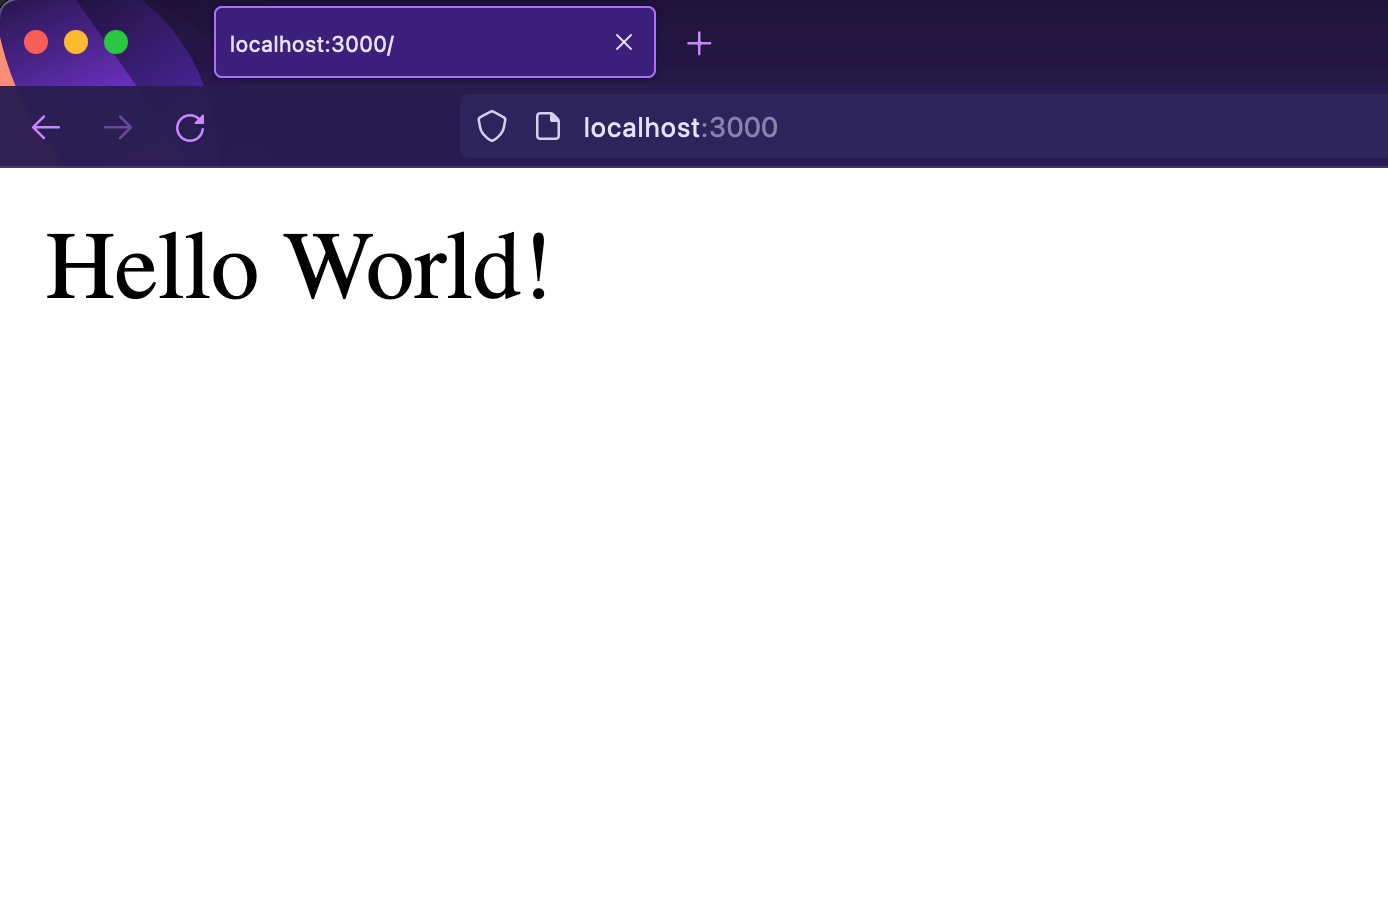
And if we visit http://localhost:3000/, we will see the Hello World! message appear in our browser
Our app is running, but if we make any changes to our index.js file and say “Hello” to the Universe instead our app does not, automatically, reflect these changes in the browser. We will have to kill our server and restart it to see the changes.
Restarting the server, manually, every time we make a change is not ideal. We can work around this by installing a package called nodemon as a dev dependency. The nodemon package will help us rebuild our app whenever a change is detected.
While our app is running, we can open up a new terminal tab and execute the following command
| |
And now when we want to restart our server, we can use nodemon to do so. Because we installed nodemon, locally, in our application, it will not be available in our system path, so we will need to prefix the command with npx
| |
Now what if someone clones our repository without the node_modules folder. Will our app still work as expected? Let’s delete our node_modules folder and find out.
If we enter our container’s shell
| |
And try to run our app
| |
We will see a message that says nodemon is not installed in our project.
| |
We could very well proceed to install it. But maybe it would make more sense if it was installed whenever our Docker image was built. We can make changes to our Docker config to introduce this behaviour.
In our Dockerfile, we can add a line that will copy the package.json and package-lock.json files from our host machine into the container. Then we can also add instructions to run the npm install command
| |
Then in our docker-compose.yml file, we can add a volume to persist our node_modules data and also map a start-up command to docker compose up
| |
Now we can exit our container to rebuild our image and fire up our app by running
| |
If we refresh our browser, our app should work the same.
Now let’s add the final touches to finalise the Dockerfile. We want to add instructions that will:
- copy all the contents into out working directory,
- expose port
3000, and - add a
CMDto run our app
We’ve added a few more steps and now our Dockerfile should look like this
| |
These changes will not change anything visually in the browser, but it will make it easier for our teammates to spin up the app in one command.
Initialise Sequelize
Now that we’re done with the Docker configuration, let’s keep going. Since we are implementing a login feature, we need Users and some way to store any data related to them.
In this section of the tutorial, we will learn how we can use Sequelize to represent a User model. We will also set up a Postgres database to persist this data. Sequelize is a widely-used ORM for the JavaScript/Nodejs ecosystem. We will use it to interact with our database instead of writing any raw SQL.
With our app running in another tab, we can install the sequelize package as a dependency
| |
We will also install the sequelize-cli as a dev dependency to help us manage migrations and project bootstrapping
| |
Now we can use the Sequelize CLI to initialise some necessary config and directories
| |
This command will create the following files and folders in our project root
config/config.json/usr/src/app/models/usr/src/app/migrations/usr/src/app/seeders
It might be a good time for us to start thinking about organising the structure of our project, so let’s shuffle some of these files around.
First let’s make a couple of new directories to hold our app code and our db code. To do this, we can run the following command in our terminal
| |
Then we need to move some of the Sequelize files into these newly created directories. Let’s move the /models folder into the app directory
| |
Then let’s move the /migrations and /seeders folders into the /db directory
| |
We will also rename our config and turn it into a JavaScript file, instead of a JSON file. We do this so that we can use environment variables within in
| |
We should also fix the line in our app/models/index.js file where we import our config. Change it from this
| |
To this
| |
We’ve made quite a few changes, but Sequelize expects the folders it generated to be found in specific locations. So we need a way to override the default paths that Sequelize expects. Let’s create a .sequelizerc config file to help us
| |
Then open it up and add the following config to tell Sequelize the new locations of its required files and folders
const path = require('path');

module.exports = {
  'config': path.resolve('config', 'database.js'),
  'models-path': path.resolve('app', 'models'),
  'seeders-path': path.resolve('db', 'seeders'),
  'migrations-path': path.resolve('db', 'migrations')
};
Now we need to open up the config/database.js file and replace the old JSON content with the following
| |
We’re pulling our settings in from values stored in environment variables and we’ve set our dialect to postgresql instead of mysql.
Environment variables
We used some environment variables within our config/database.js file, but they do not exist yet. Let’s create a .env file to store them
| |
Within the .env file, we can add the following variables. We’ve formatted them in this way because this is how Railway names their Postgres related variables. We can leave the PGHOST blank for now, but we will come back to it
PGHOST=db
PGPORT=5432
PGUSER=divrhinopasskeys
PGPASSWORD=divrhinopasskeys
PGDATABASE=divrhinopasskeys_dev
Now we can go ahead and update the web service config in our docker-compose.yml file so that it pulls variables from our new .env file
| |
Postgres service in docker-compose
In the previous section, we initialised the ORM, Sequelize, with the intention of using it with a Postgres database. We don’t have a database just yet. So let’s quickly add a new service for it in our docker-compose.yml file
| |
The docker-compose.yml file will use these values in our .env file to spin up our Postgres database.
We can kill the server and rebuild our app and check that our Postgres service is working by starting up our app
| |
Then entering the db service’s shell in another terminal tab
| |
and using psql to try and connect to our database
| |
If all is successful, we should see the following prompt in our terminal
psql (16.0)
Type "help" for help.

divrhinopasskeys_dev=#
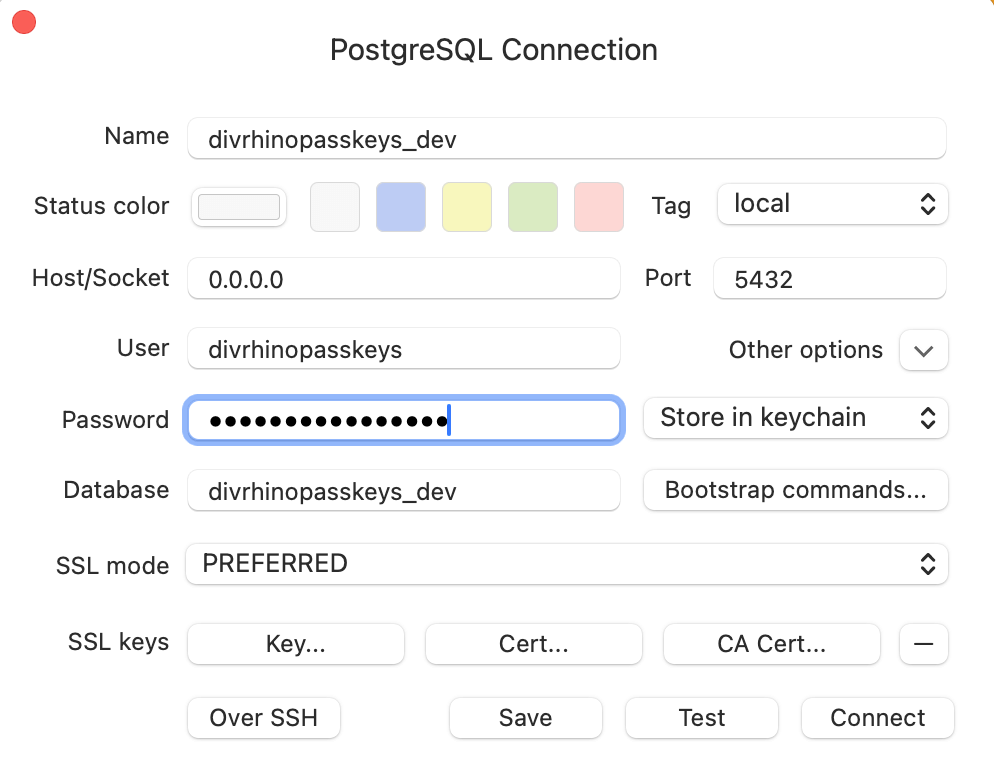
We can also use a GUI database client to connect to the database. This is similar to using psql in the terminal, but with the benefit of not having to look up the various commands
Wiring up Postgres with Sequelize
We’re added both Sequelize and Postgres to our project with the intention of having them work together. However, they are not connect to one another yet, so we need to start wiring up them up.
Let’s install the Postgres npm package to make it easier to interface with Postgres from our JavaScript code
| |
Then we can create a little helper function so we can easily pass our database around to different parts of our app. Let’s first create a db/helpers directory to hold our new module
| |
then we can create a new file within it to initialise our database
| |
In the db/helpers/init.js file we can create a new Db class that uses the environment variables to connect to the database. Then we initialise and export a database instance to be used in other parts of our app
| |
First database model
Now everything is set up to allow us to create our first database model.
While our app is still running, we can open up a new terminal tab and run the following command to generate a new Sequelize model called User. This will also create a corresponding migration file. For now we will only set the email attribute
| |
Once the User model file has been generated, we can manually add the remaining attributes to our model and migration. First, in our model, we can update the init function to include all the other attributes we need. We will also specify the modelName and tableName
| |
And over in our migration file, we can add the same attributes. Making sure to use Sequelize instead of DataTypes. The migration file has an up method that executes when the database is migrated, and a down method that is executed then the database migration is rolled back
| |
With those edits, our first model and migration are ready. Let’s migrate our database by executing the following command
| |
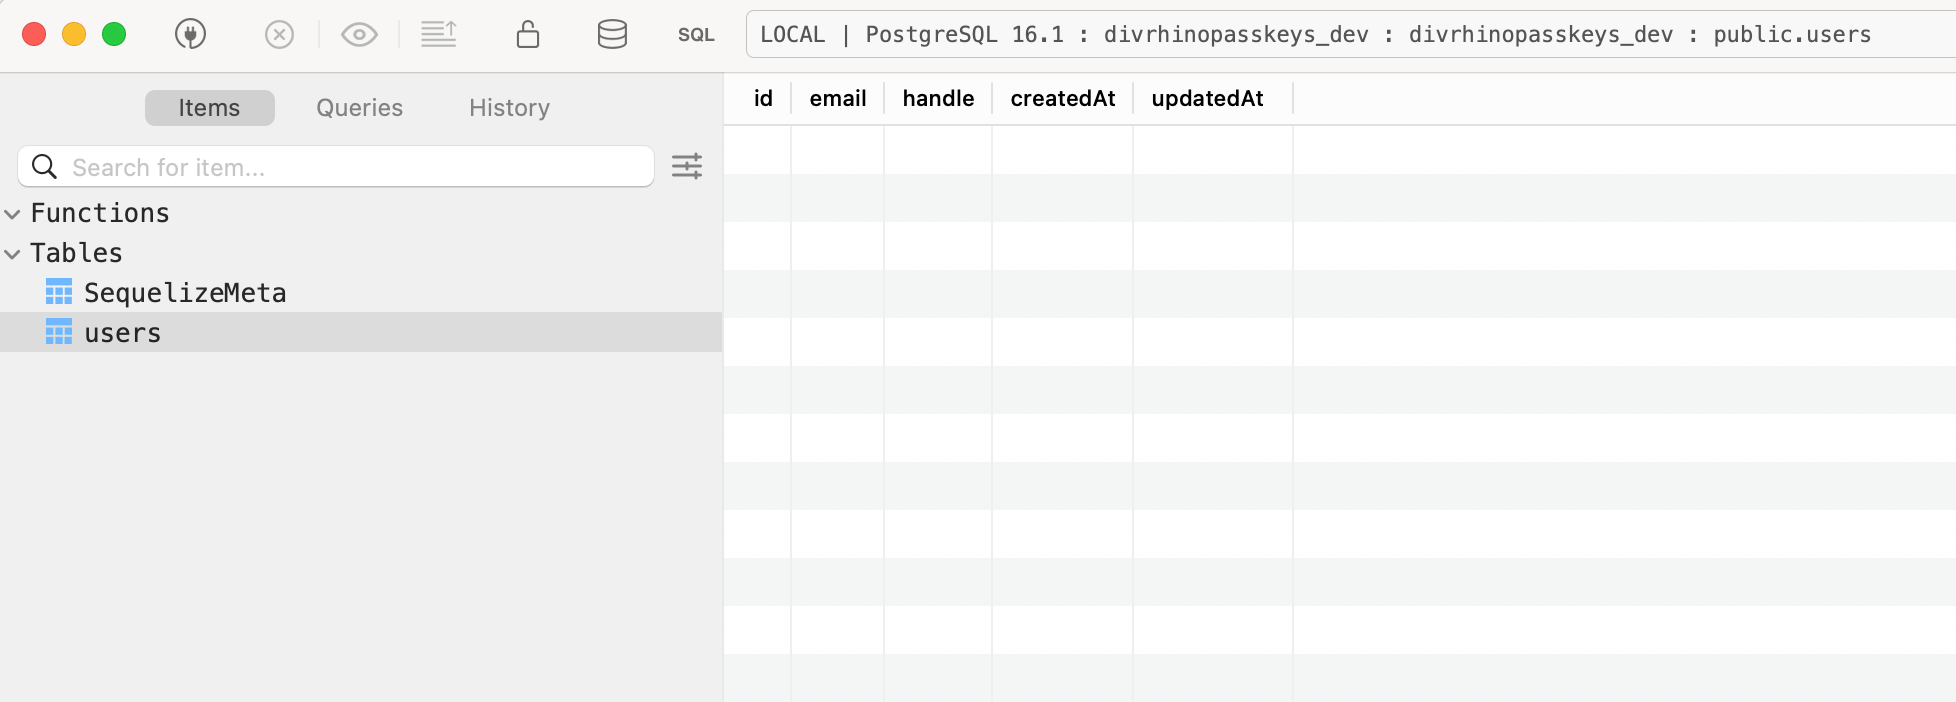
If we head into our database client of choice, we will notice that a users table was created, containing all the columns that we had specified, above. This can give us confidence that our migration was successful
Routes and controllers
So far, we’ve only been working with the default / route. But in this section, we will be creating a few new views and adding corresponding routes for each of them. We will create a new routes.js file in the /config directory to organise things
| |
And within this new file, we will require the express package. We will use it to create a new router and export it
| |
Now we will move our one and only route from index.js into the config/routes.js file
| |
Then we can import out routes file into index.js. The file should now look like this
| |
We can further clean up our routes.js file by introducing controllers. We will create a new /controllers directory to organise them
| |
Our first controller will be the pages controller
| |
Within this file, we will create a PagesController call and export it
| |
Now we will move the callback function out of our route and put it in the PagesController. We can refer to this function as a controller action. We will also modify it a little so that it only renders when the user is not logged in. The controllers/pages.js file should now look like this
| |
Now we can import and instantiate our PagesController into the routes file. The routes.js file should now look like this:
| |
That gives us our first route and corresponding controller action. We can head into our browser to see the results.
Add support for frontend views
Now we’re in a good place to start creating some views. We will use the ejs package for templating and the express-ejs-layouts package to help us create generic layouts that all our views can share. Let’s install them both using the following command
| |
Once they are installed, we can head into our index.js file and configure our app to use these two packages. We will import and use layouts, then we will tell express where to join all our view files by setting the views property. We will also tell express which layout to use by setting the layout property and then set our view engine to use ejs so it understands that we are using ejs
| |
Now we can start creating some view files. We will need a views directory to organise them
| |
The first view file we create will be the application layout file that will be shared between all our views
| |
In application.js, we can add our boilerplate HTML structure
| |
Now let’s create out first view file. The directory will match the name of the controller
| |
And in the welcome.ejs file, we will add some markup
| |
Now in our PagesController, we can update the welcome function to render a view file instead of just sending through some text
| |
If we refresh our browser now, we should see the new markup for our welcome page.
Static assets
Now that we have our initial views, we can start considering how to handle the different types of static assets we can use within our views. In this section, we will work on adding stylesheets, script files and images.
By default, Expressjs expects static assets to live in the /public folder. This folder does not exist yet, so let’s create it now
| |
Then within in, we can make a subfolder to organise our stylesheets
| |
Since our app is pretty small, we will have one stylesheet called main.css
| |
And in main.css, we will add some arbitrary style so that we can test it out in the browser to see if it is imported correctly
| |
We can import the main.css stylesheet into our application layout file so that all our pages have access to it
| |
If we head over to our browser and refresh, nothing happens. This is because our app doesn’t know anything about the static files in the public folder yet. Let’s change that. In our index.js file, let’s add this config under our templates config
| |
Now when we refresh our browser, we can see the pink background colour has been applied to the body.
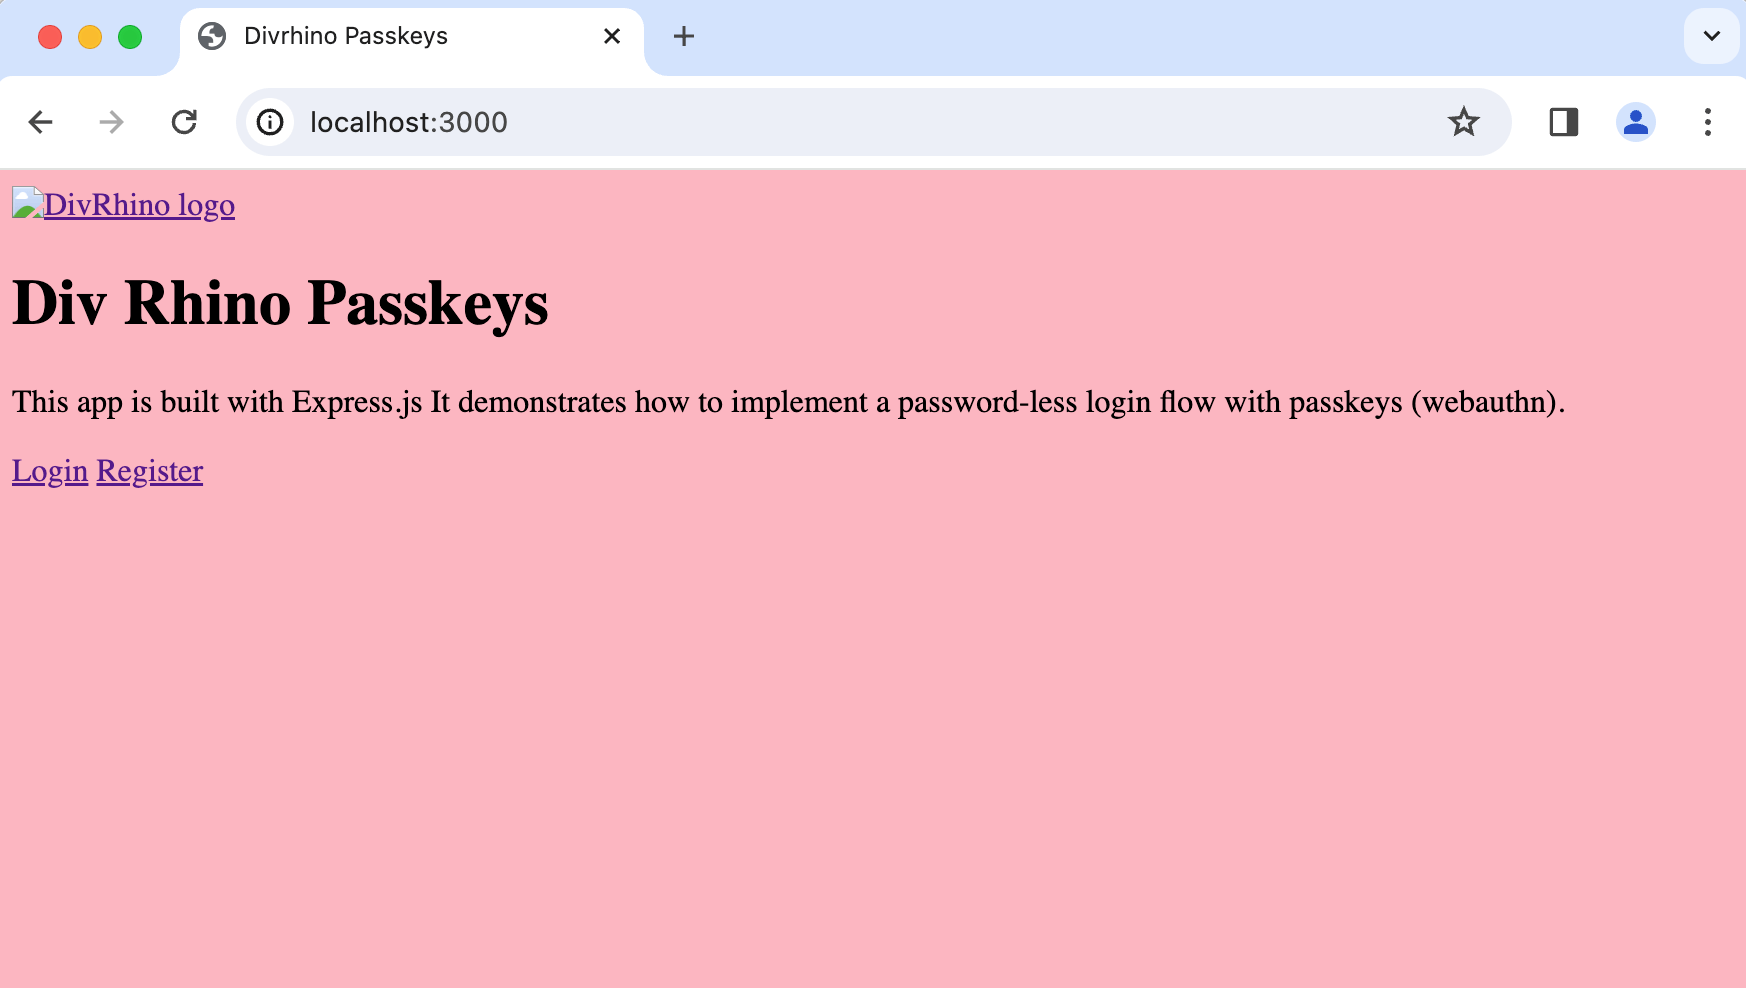
Now that we know our stylesheet is loading, correctly, we can copy over some ready-made styles from the project repo on Github. CSS is out of scope for this current tutorial, so we won’t be explaining any of it. But please feel free to dive into it on your own if you’re curious.
Frontend views
We will not be taking a deep look at HTML and EJS in this tutorial, as the focus is to gain a better understanding of passkey authentication. So we will be including the finished markup without any elaboration.
We will add
auth/registerauth/loginadmin/dashboard
auth/register
Let’s create a new file to house our registration form. This will sit in a new views folder called auth
| |
We have our register view, but if we navigate to http://0.0.0.0:3000/register in the browser, we see the following error:
Cannot GET /register
This let’s us know that the /register route does not currently exist, so we will have to create it. In our routes.js file, we can add a new register route. And we can also import the auth controller that does not exist yet
| |
We will create a new file for our auth controller. This is where we will add all our auth-related actions
| |
And within the auth controller, we can add the register action that we referenced in our /register route
| |
Then we can add the related markup to the views/auth/register page. We will not be explaining this
| |
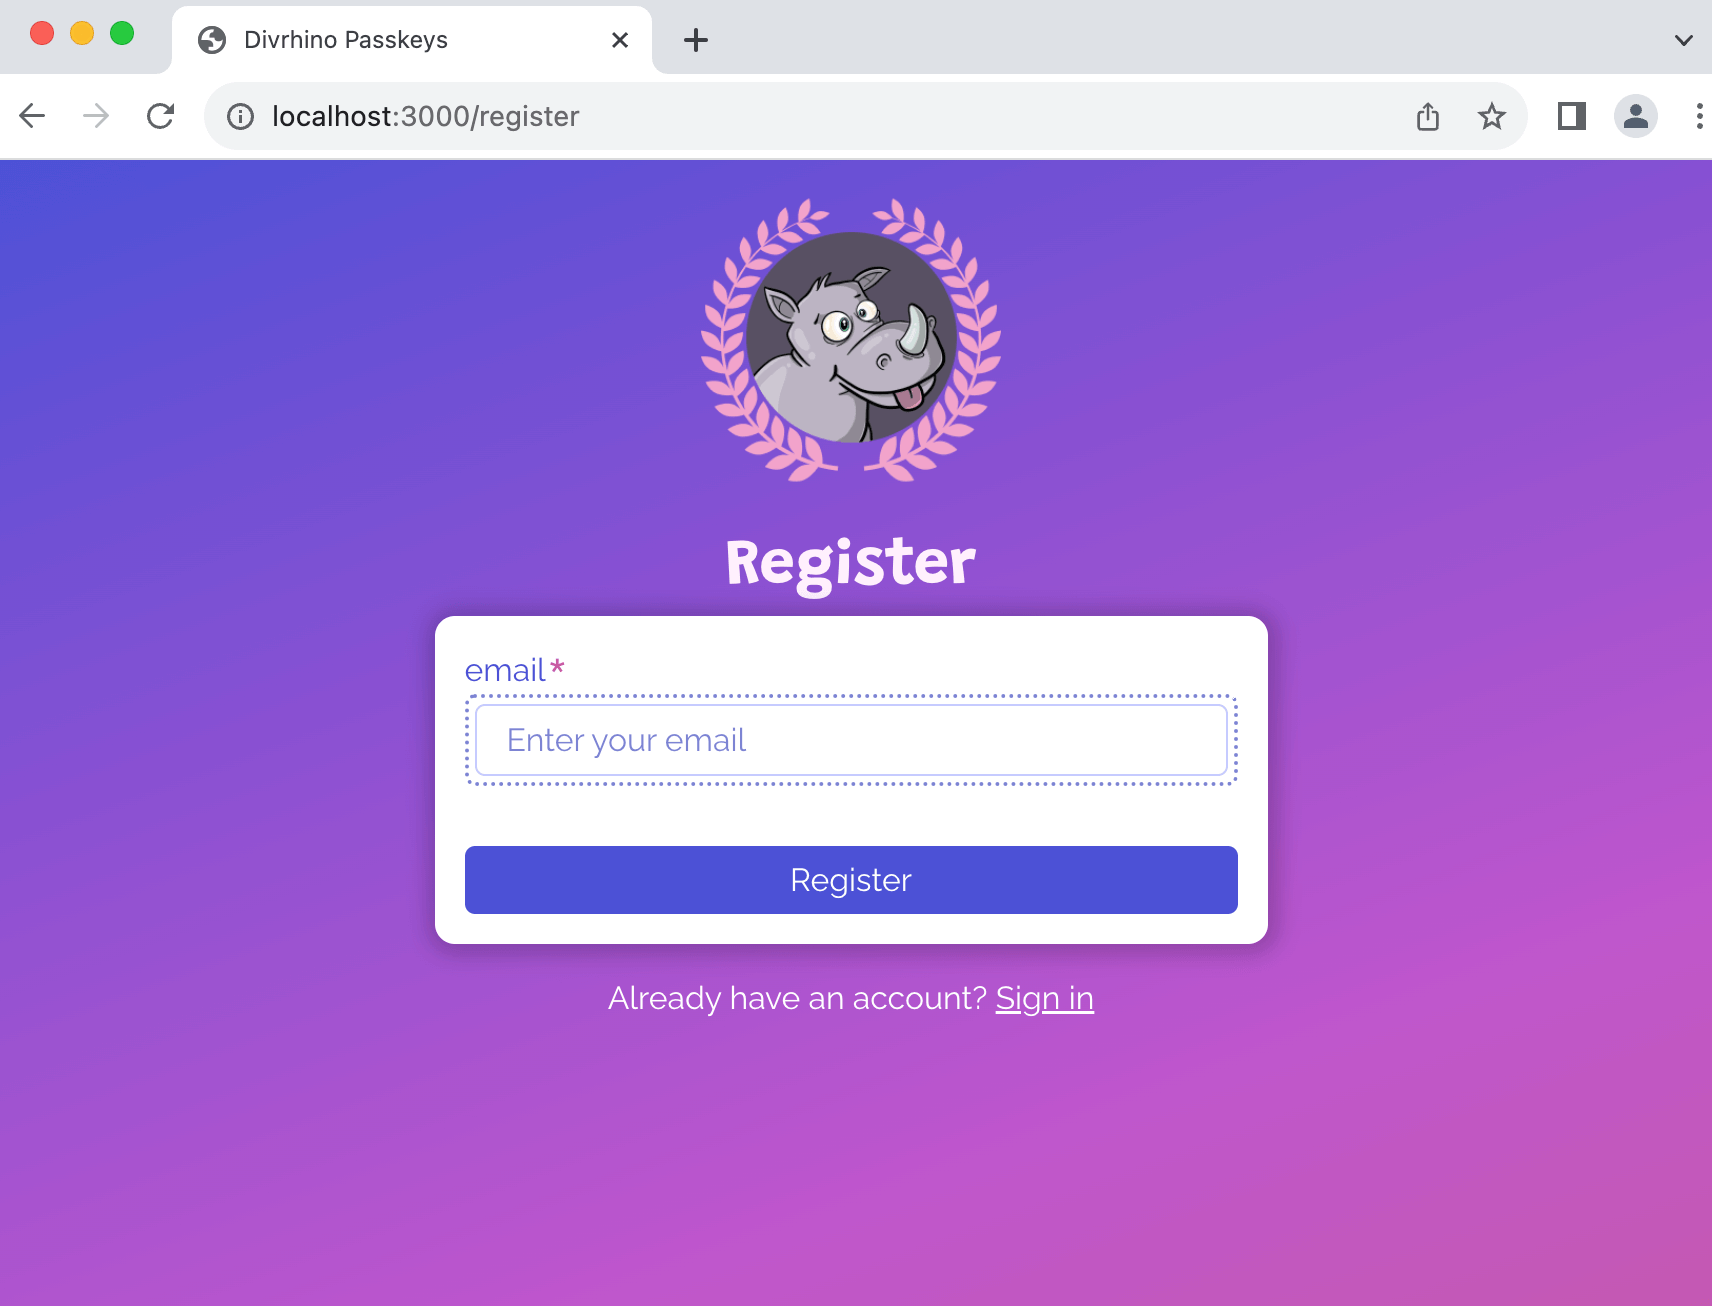
If we visit the /register page in the browser now, we will notice that there is a broken image tag. Our app is already configured to handle static assets, so we can just created an images folder in the public directory and it will work without any additional wiring
| |
All the images we need are available in the project repository on Github. So let’s download them and place them in the public/images directory. And now when we refresh our browser, our logo image should show up. We should also be able to see our custom cursors.
auth/login
While we are still on our /register page, let’s click the link to Sign In. We would normally expect to be redirected to the login page. However, we see a familiar error, instead
Cannot GET /login
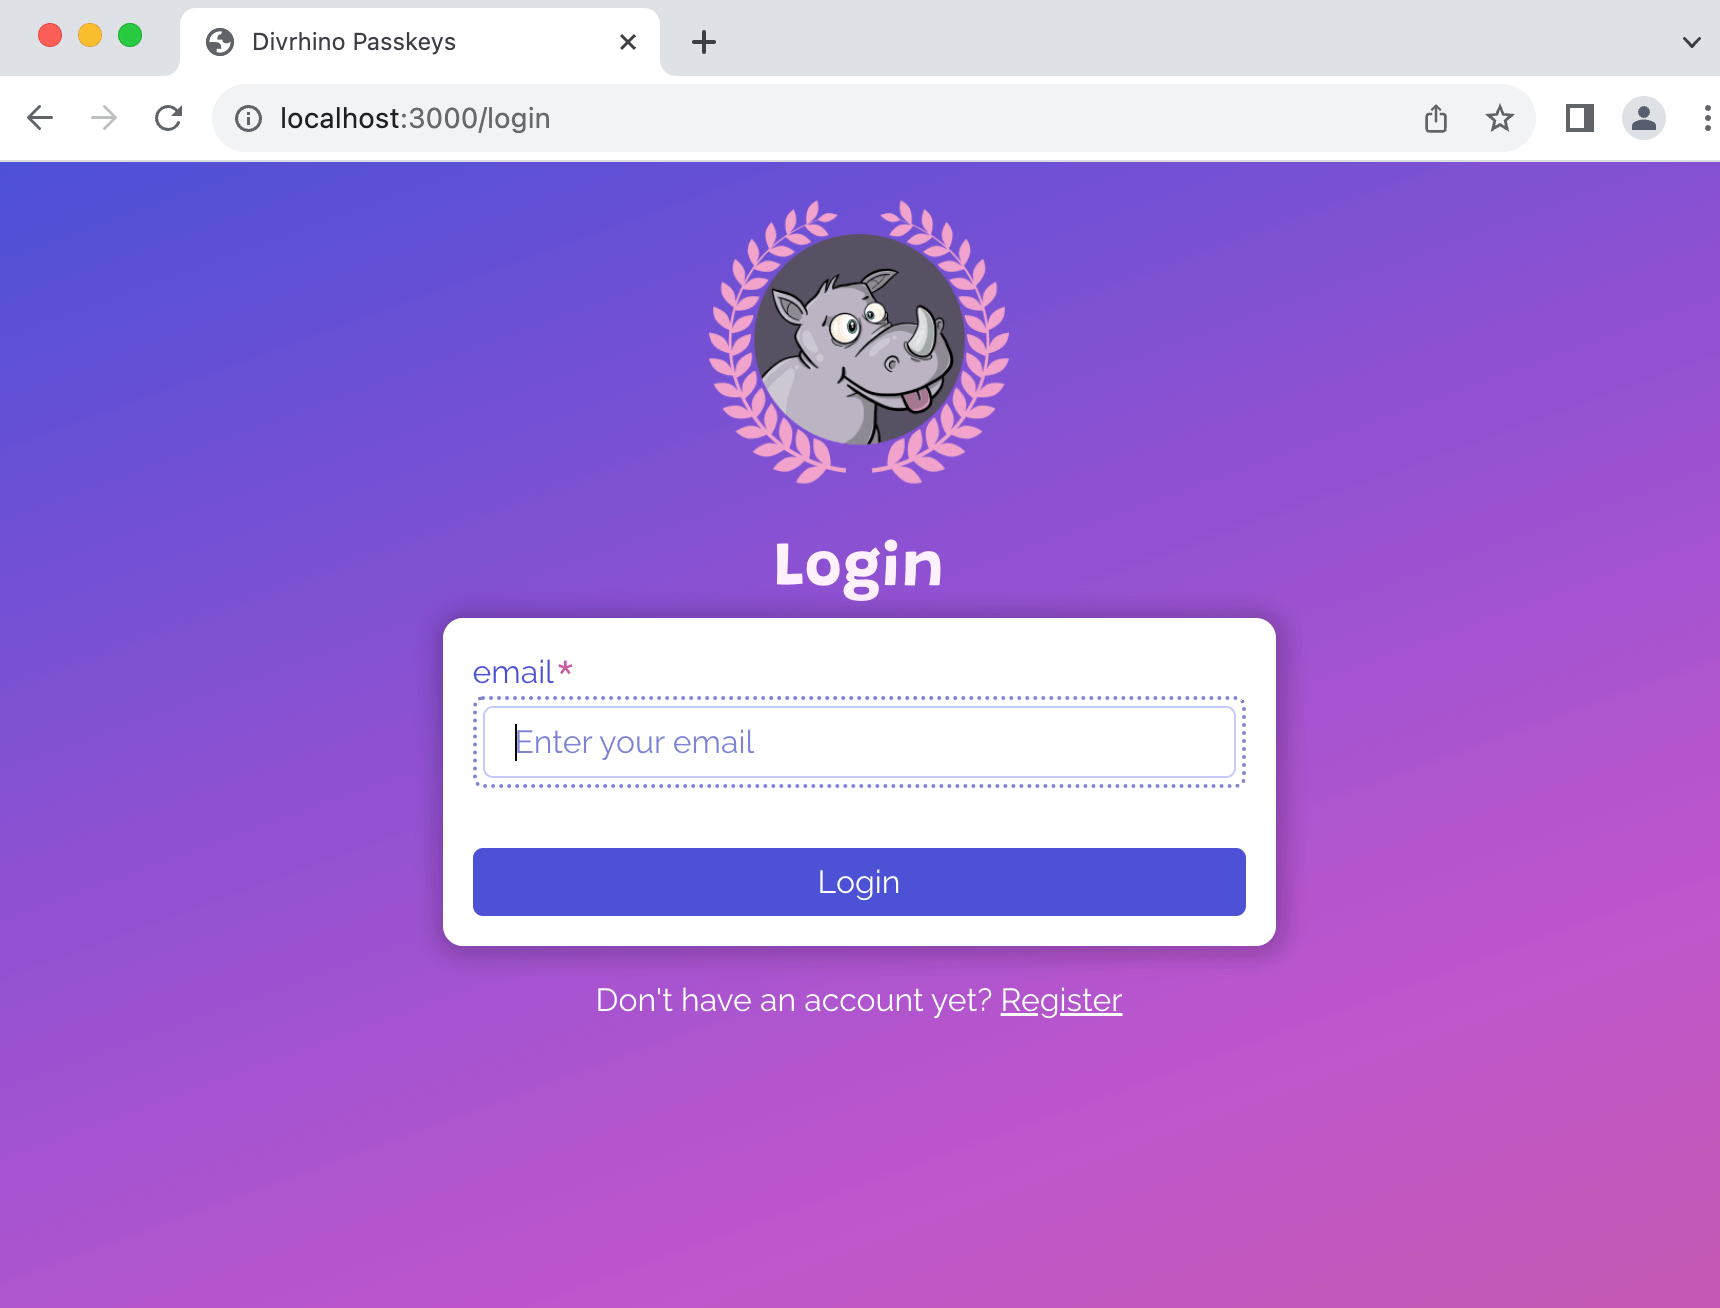
This indicates that the /login route does not exist just yet, so let’s create a new file for it in the auth views directory
| |
Over in our routes.js file, we can add a new login route, which references a login action that does not exist yet
| |
So we can head into the auth controller to add a new login method which will render a login view
| |
We can paste the following markup into our login EJS view
| |
Now if we refresh our browser, the /login page should be rendering correctly.
admin/dashboard
The final page we need to create is the dashboard. This page should only be visible when a user has logged in.
First, let’s create a new admin folder in our app/views directory. Then within this directory, we can create our dashboard.ejs file
| |
In our routes file, we can import the AdminController and let’s update the root route (/) to take another action for our admin.dashboard
| |
If you notice, the admin.dashboard action does not exist yet. In fact, we’re even importing the admin controller when it doesn’t even exist yet either. So let’s create it
| |
Now we can create a new dashboard action in this new AdminController
| |
We can paste the following markup into our dashboard EJS view
| |
We won’t look at our dashboard until after we sign in. So for now, let’s just trust that it works as expected.
And those are the all the view we will need to start implementing our authentication workflow.
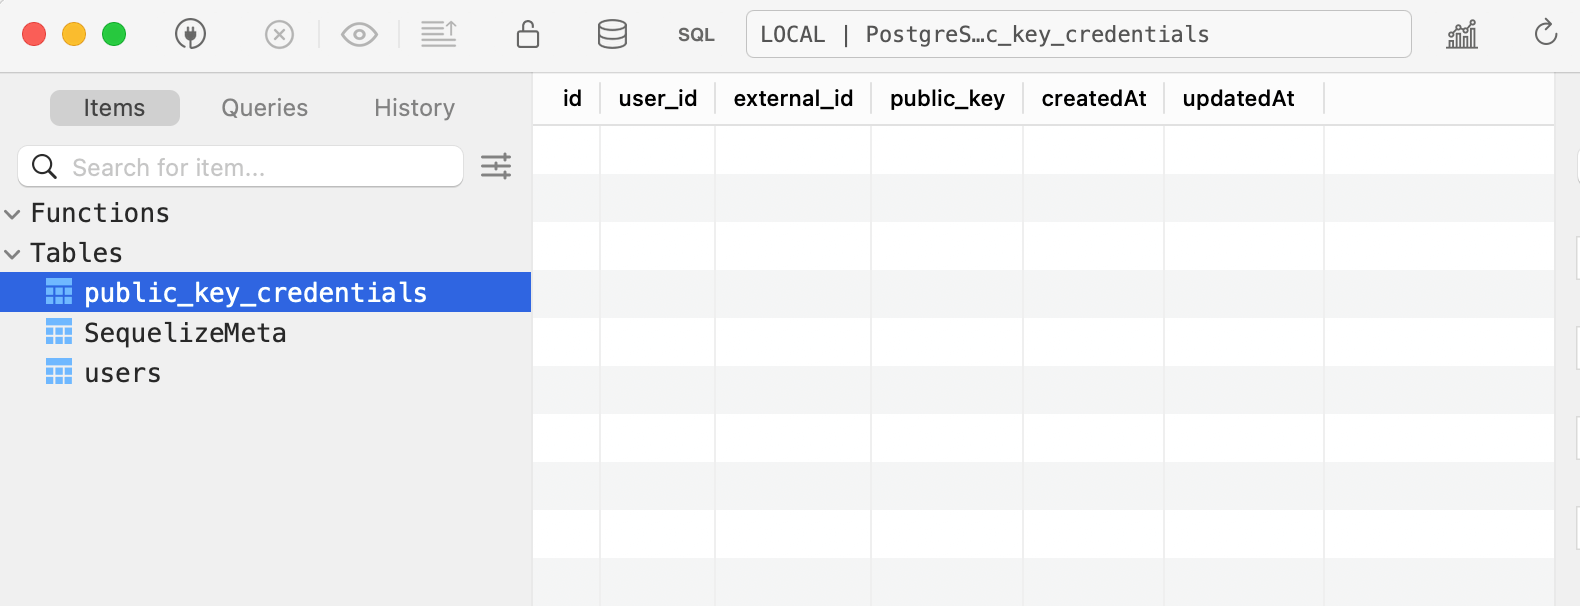
The PublicKeyCredentials table
Next up, we need to create a new database table. We already have a users table in our database. Now we need to a table to store our users’ public keys. We will call it public_key_credentials. For now, we will only include the public_key attribute in our command
| |
If the command executes successfully, we should have a new model and migration file. Now we can manually add the remaining attributes to each file. Let’s edit the model file first. We can add more columns for our table. A user can have many public_key_credentials, so we will need to configure a user_id as a foreign key under associations. Then we will have two string columns for an external_id and a public_key. We will also set the modelName and tableName
| |
Then over in our migration file, we can add the same attributes. Making sure to use Sequelize instead of DataTypes.
| |
We should also update our user model to have a hasMany association for public_key_credentials, remembering to also specify the foreignKey
| |
Those are the only edits we need for this resource, so we can migrate our database by executing the following command
| |
Now if we look in our database client, we should see a new public_key_credentials table with all the columns we just added.
Configure Passportjs
We now have all the database tables we need, so we can start configuring Passport.js.
Passport.js is one of the most widely-used auth solutions in the JavaScript ecosystem. It comes with a variety of “strategies” that you can explore in their docs. We will be using the WebAuthn strategy in this tutorial.
First we need to install the base passport package as a dependency
| |
Then we will install the WebAuthn strategy to give us the functionality we need to use passkeys. This strategy will allow our server to generate a challenge that can be used during the attestation (register) and assertion (login) phases
| |
We’re going to create a little Passport service to act as a wrapper around our Passport-related code. Using a service will allow us to keep this contained in its own module so our index.js file is cleaner. It will also make it easier to swap out the code if we decide to go with another strategy in future. Let’s create a new app/services directory to organise our services
| |
Then we can make a new file for our passport-service
| |
We will add a basic skeleton for the module
| |
And import our new service into our routes file so that is has access to the challenge store. We will pass this same challenge store to a couple of future routes too.
| |
Opening up our PassportService file, we can start putting our service together. We will essentially need to set up 3 main functions
- A function that sets
passportup to use theWebAuthnStrategy - A callback that
passportcan use toserializeUer - A callback that
passportcan use todeserializeUser
The first function will be called useWebauthnStrategy(), because that’s what we’re hoping to use it for. It will take in an instance of SessionChallengeStore as it’s only argument and it will return a new instance of WebAuthnStrategy.
Within the function body, we will return a new WebAuthnStrategy instance. We will need to pass it three bits of information:
- a
storeobject - a
verify()callback, and - a
register()callback.
The store object is pretty straightforward. We will create a new Object literal with a store key set its value to the instance of SessionChallengeStore that we has passed it. This is what we will use to generate a challenge.
The verify() callback will be used when logging the user in, and the register() callback will be used when registering a new user.
| |
Let’s start fleshing out the verify() method first. The end goal of this function is to look up a specified user in the database and get their public key. Again, as we mentioned above, this will allow us to log them in.
We will pass in the id, userHandle and a done callback as the 3 arguments. And we will wrap all the database querying actions within a database transaction. Using a transaction means that we can rollback, without committing any changes to the database, if something goes wrong. We will also use a try...catch statement to facilitate a rollback path, just in case we need it
| |
We don’t need to add anything more to our catch block, so we can just focus on the try block. First, we will query the database to findOne result for a PublicKeyCredentials record that is associated with the current user’s external_id. If we are unable to find one, we will call the done() callback with an error message
| |
If we are able to get a PublicKeyCredentials record for the current user, we will use its user_id value to find the actual user record too. And if the user record does not exist, we will execute the done() callback and send back an error message. However, if we are able to find a relevant user record, we will compare it’s handle column against the userHandle we pass into the function. Then we will commit the transaction. At this point, the verify() code would have successfully determined who current user, so it invokes the done callback with the user record and a public key
| |
The final verify() method should look like this
| |
Because we were only reading from the database, we didn’t technically need to use a transaction. However, demonstrating it here will help us get used to the idea of it a little more, as we will see it again very soon.
Before we move on, we should also remember to import the db and the Sequelize models at the top of our passport-service.js file because we are using them within the code we just wrote
| |
Now we can start working on the register() callback. The end goal of this function is to create a new user and a new associated PublicKeyCredentials record in the database.
We will pass in the user, id, publicKey, and a done callback as the 4 arguments to the function. We will also wrap everything in a try...catch statement and execute the database actions within a database transaction. As we mentioned previously, using a transaction will give us the ability to rollback the changes if anything goes wrong.
The user refers to the user data we pass in from the request. The id will be used as the external_id of the PublicKeyCredentials record. We will use this to “label” or “identify” public key records. The publicKey refers to the encoded publicKey and challenge. Once we successfully persist the necessary database records, we invoke the done() callback with the newly-created user record
| |
We will use the handy create() method we get from Sequelize to create a new user record using the email and handle. Since this is happening in a database transaction, we also pass in a options object that contains the transaction. And if, for whatever reason, we are unable to create a new user record, we will invoke our done callback with an error message
| |
After we’ve successfully created a new user record, we will move on to creating its associated public key record. Since this action is also being performed in the same database transaction as our previous action, we will pass in the transaction in the options object. And if, for some reason, we are unable to persist a new PublicKeyCredentials record, we will invoke the done callback with an error message
| |
The final register() method should look like this
| |
The verify() and register() methods are the most involved parts of the PassportService. But we still have a little more to go before our service is ready. We need to use passport to serialise and deserialise the user.
Let’s start with creating a token via the passport.serializeUser() function. Passport will call the serializeUser function to serialise a user to the session. So it will take the regular JavaScript object containing the user details and convert it into an encrypted string (token). When a user is serialised, we call pass in a custom callback function (i.e. this.serialiseUserFn) that invokes done() callback with a regular JavaScript object that contains the user’s id and email
| |
To read user information from the token, we can use the passport.deserializeUser() function. Passport will call the deserializeUser to read and deserialise user information from the token. And when we are deserialising, we pass in a custom callback function (i.e. this.deserialiseUserFn) that will invoke the done() callback with the user
| |
And with that, we can wrap up our PassportService. You can refer to the finished service in the Github repo to compare your code if you get stuck. Let’s keep moving.
Sessions
The WebAuthn API requires session support. So we will need to set that up. We will utilise the express-session middleware to help us.
So let’s install that first and we will configure it later
| |
We will also need to install connect-session-sequelize so that we can use Sequelize to store our session data in the database
| |
Now that those two packages are installed, we can configure them in the index.js file. We will create a new sessionStore and add some settings like the maxAge of the cookie. Then we will call sessionStore.sync()
| |
If you noticed, we have used an environment variable process.env.SESSION_SECRET in our session settings. This doesn’t exist yet, so we can add it to our .env file
| |
Now if we refresh our browser, we can look in our database to see that a new Sessions table has been automatically created for us.
Configuration for form submission
Because we need to be able to submit form data within our application, we need to configure our app to support this.
First let’s ensure our app knows how to work with JSON. We can use the express.json() function to add this functionality. This is a built-in middleware that parses incoming requests that contain JSON payloads
| |
And since we’re also working with multipart form data, we should also install a middleware called multer
| |
Then we can configure it in index.js
| |
And since our sessions use cookies, we will also add the cookie-parser package
| |
Then configure it
| |
While we are here, we should also tell our app to handle urls that contain query param data. When the extended option is set to false, express will use the querystring library to parse the url-encoded data
| |
Passkeys
We have finally reached the main attraction: Passkeys!
Before we dive in and start implementing our authentication with passkeys, let’s take a little time to go over a high-level view of the whole passkey authentication process.
Passkeys are used in 2 different phases
- the
attestationphase, and - the
assertionphase
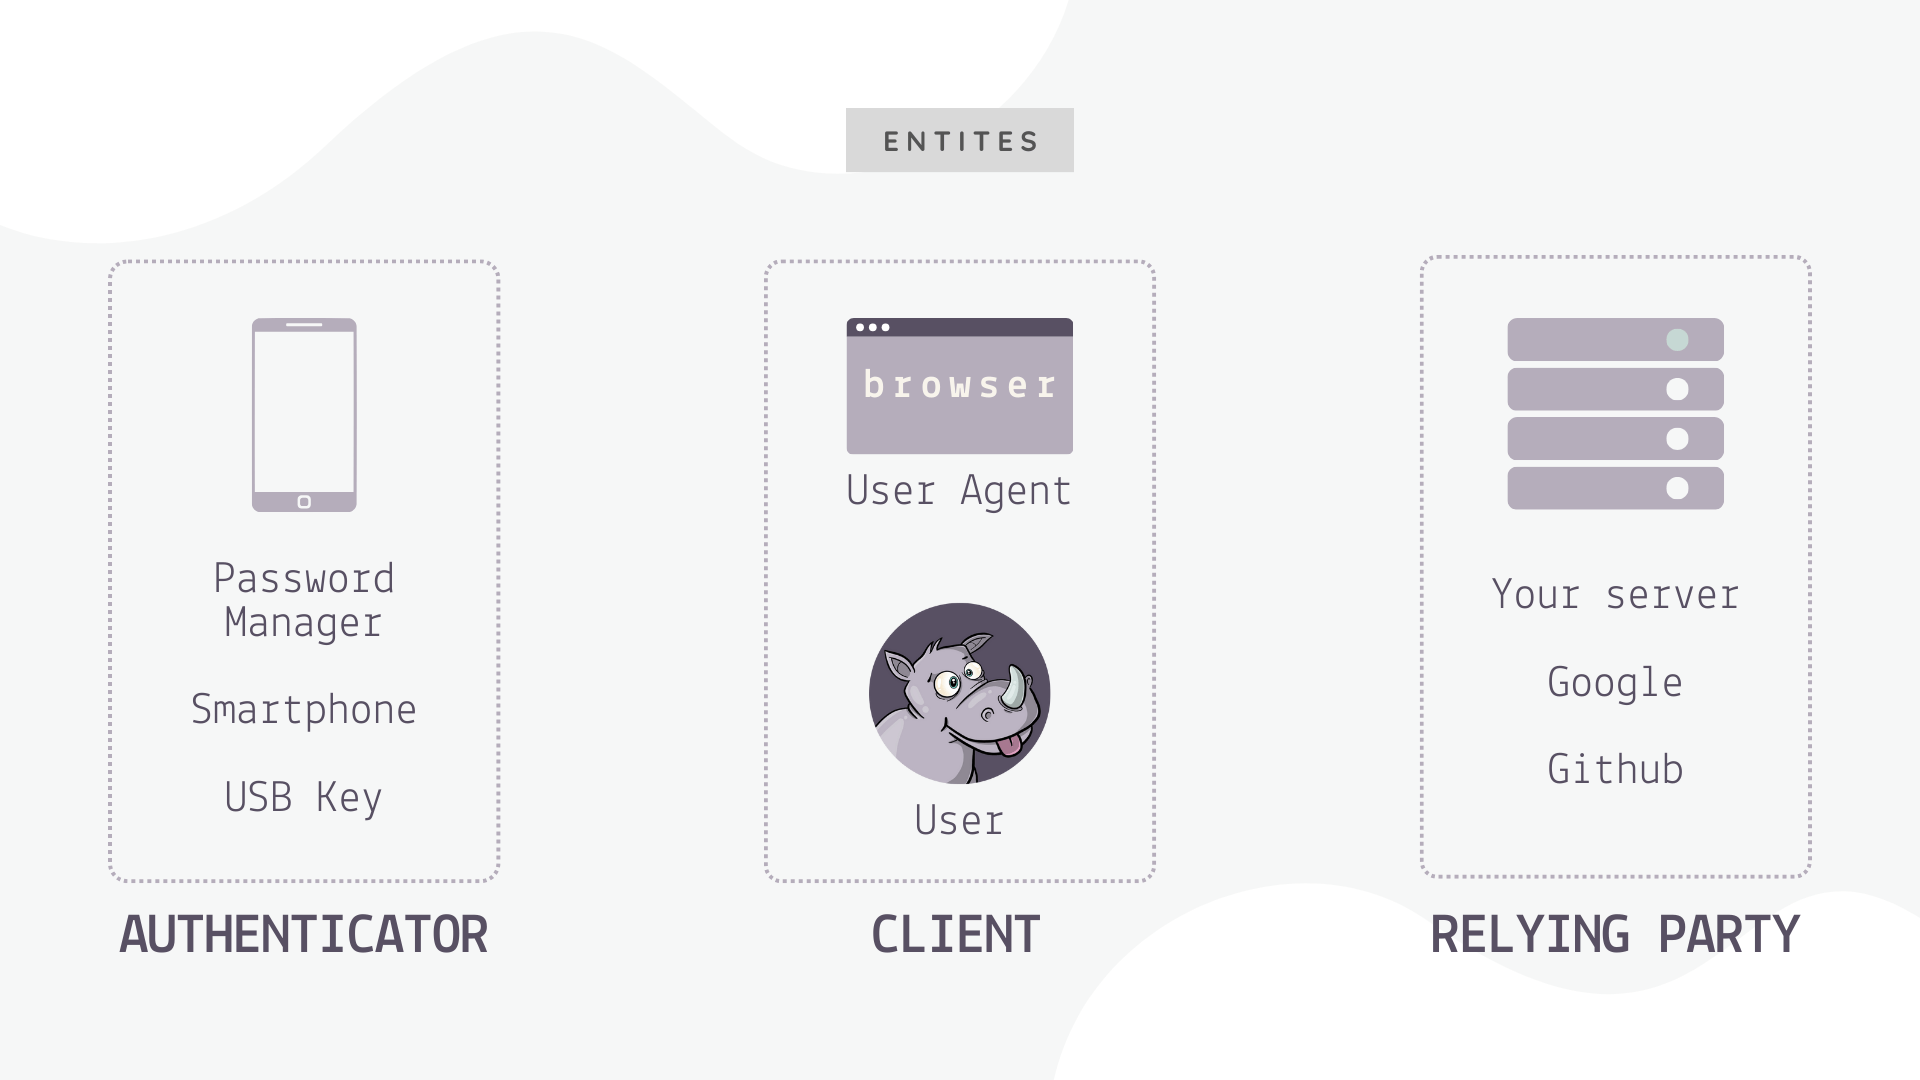
The attestation phase can be thought of as the user registration part of the process, while the assertion can be seen as the user login part. And during these phases, there are 3 main entities working together
- the
client - the
authenticator, and - the
relying party
We will implement the two different phases in the next few sections.
Phase 1: Attestation (creating a passkey)
The first phase we will go over is the attestation phase. In the attestation phase, a new public key credential and associated user is registered. In a regular web application, a user would create an account with their email and password. When using WebAuthn, a user is created with an associated passkey to be used in place of a password.
To create a passkey, a few things need to happen between the client, the authenticator and the relying party. Below is a high level summary of the 3 main steps in the process
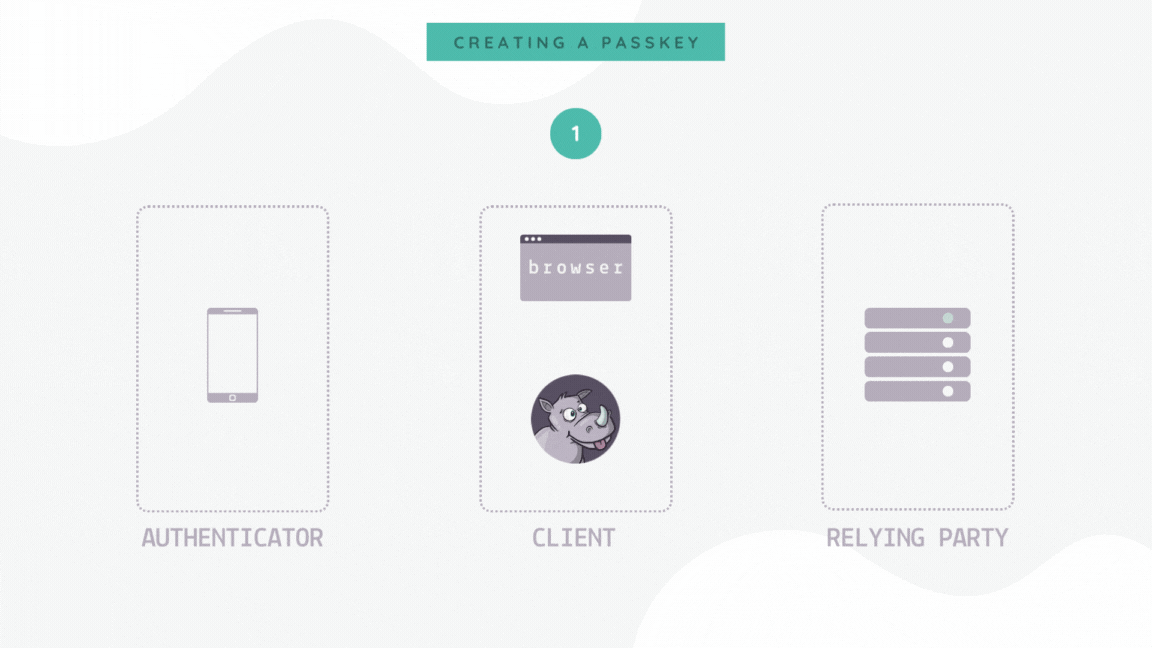
The
usersubmits the registration form, prompting theclientto request achallengefrom therelying party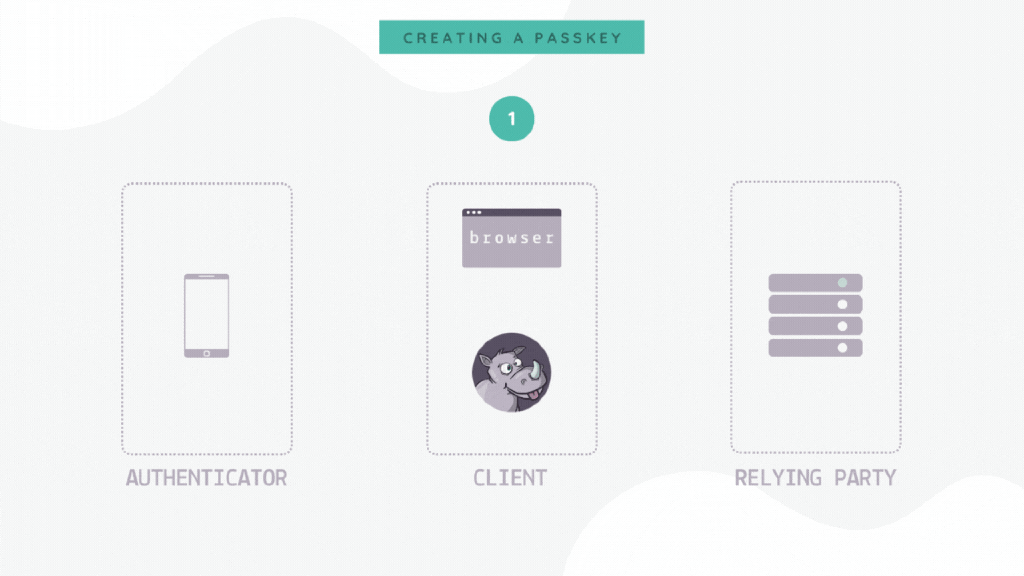
Image: phase-1-step-1 The
clientcalls thenavigator.credentials.create(challenge)method, passing in thechallengethat was received. Thenavigator.credentials.create()method is made available to us from the Web Authentication API. This will prompt theauthenticatorto use thechallengeit receives to create private+public keycredentialpair. Theuseris verified via thumbprint. Theprivatekey is stored on theauthenticatorand is used to sign thechallenge. Then thepublickey, thesigned challengeandcredential idare sent back to client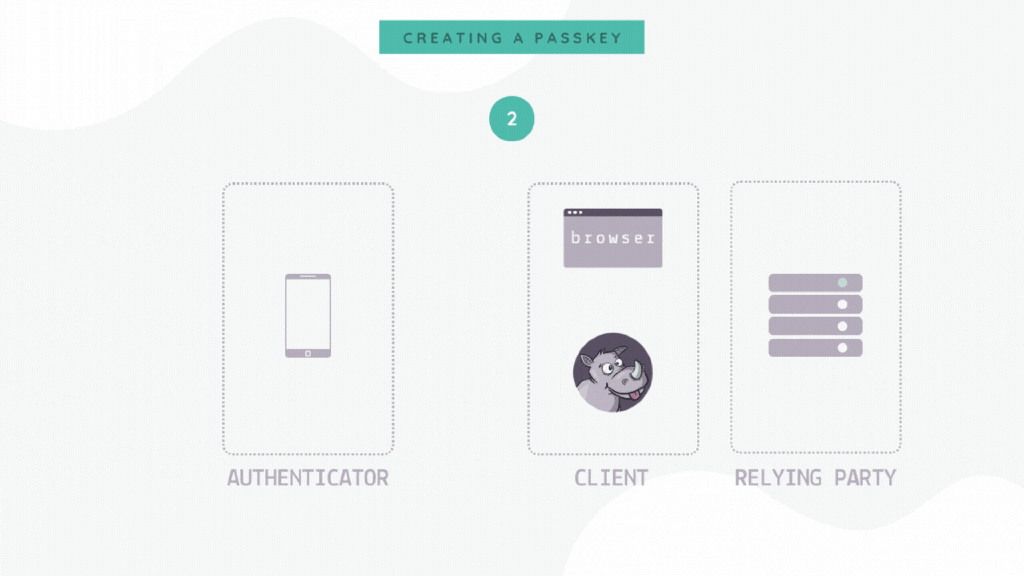
Image: phase-1-step-2 The
clientsends thesigned challenge,credential id, andpublickey onwards to therelying party(server). The server verifies thesigned challengewith thepublickey andsessioninformation. If the verification process is successful, the server will store thepublic key credentialsanduserin the database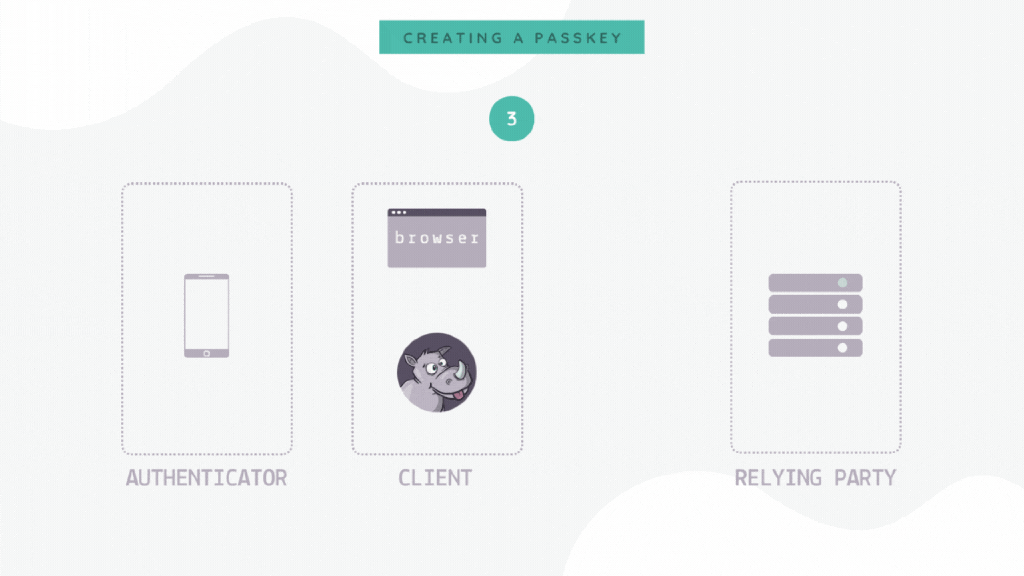
Image: phase-1-step-3


Now that we have an idea of the flow we want to achieve, let’s start working on the code. We will try to mirror the process we just went through in the overview, above.
Starting with the registration form. If we take a look at the register view file, we can see that we have already imported the attestation-register.js script file into the register view. This file will contain code that will allow us to submit the registration form. This script file does not exist yet, so we will create it soon. You may notice that we are also importing the base64url package. We will copy the contents for this from our project repo
| |
Let’s create a scripts folder in the public folder to organise our frontend JavaScript files
| |
Then within it, we can create our attestaion-register.js file
| |
And also our base64url.js file
| |
We can head to our project repo and copy over the contents for this base64url.js file.
Now inside the attestation-register.js file, we can start creating our Register module. It will just have an init method for now. The init method will take the event as its only argument. Then we will add some code that will listen for the window object to load. Once the window has loaded, we will add an eventListener to the registration form, so whenever it is submitted, we will create a new instance of our Register class and call init(). We will also prevent the default behaviour that the browser gives to the form element
| |
We’ve listed the four functions we will need in order to complete our Register module. The first 3 correspond to the steps we discussed in the overview for phase 1. Step 4 will just redirect the user to the appropriate route.
The first function we need will get fetch a random challenge from the server by using the fetch API to make a request to the /register/public-key/challenge endpoint. We will store this challenge in a variable so we can pass it onto the next function
| |
The /register/public-key/challenge endpoint does not exist yet so lets switch over to our routes file on the server side and create it. It will take in the challenge store as its only argument
| |
Our new route calls an AuthController action named createChallengeFrom(), which does not exist yet. So let’s head into the AuthController file so we can create it. Within the auth controller, we can add the new createChallengeFrom method. As mentioned above, it takes in the challenge store as its only argument and returns a middleware function.
Within this middleware function body, we will set up a user object. It will have an id and a name. The id will be a unique uuid that we generate with the help of the uuid package we import at the top of the file. The name will be set to the email value the user provided in the registration form. The user object and the challenge will be returned in the JSON response
| |
We are using a package called base64url in this controller code. This package will ensure that binary data and urls are properly encoded to plain text to avoid ambiguity. We imported it, but haven’t added it to our codebase yet, so let’s do that now
| |
We also imported the uuid package without installing it, so let’s install that too
| |
And with that, our createChallengeFrom(store) method is done. We can head back to our attestation-register.js file and continue our main quest.
The second function will use the navigator.credentials.create() method to prompt the authenticator to use the challenge it receives to create a private+public key credential pair. The authenticator will also ask the user for verification in the form of a fingerprint or similar. The private key is stored on the authenticator and used to sign the challenge.
Within the options, we have indicated that would like to create new credentials that have the type publicKey. Within the publicKey option, we send along:
- the
nameof the relying party userdetails- the
signed challenge - information about the
authenticator, and - an array of supported
pubKeyCredParams
| |
The third function will create a new user in the database and allow this new user to loginWith(credentials). It will use the fetch API to make a POST request to the /login/public-key endpoint and pass along options that include clientDataJSON and an attestationObject. Then it will return the logged in user object, which we will store in a variable called currentUser
| |
The /login/public-key endpoint does not exist yet, so let’s switch gears a little bit and head into the backend to work on it. We’ll start by adding a route to our routes file. We have 3 actions listed. First we will use passport.js, under the hood, to see if the user is authenticated. Then we will call the next handler in the list. If the user is authenticated, we will admit them to the dashboard. However, if they are not authenticated, we will fall through to the last action and deny them entry
| |
We haven’t created any of these three AuthController actions just yet, so let’s head into the AuthController file and create them now.
For the passportCheck(), we will use the passport.authenticate() method with the webauthn option and we will add a couple of settings for the error messages
| |
And since we’re using the passport package, we should also ensure it is imported at the top of the AuthController file
| |
Next we can add the admitUser middleware function. This will return an object with an ok field set to true and destination value set to the root route i.e. /
| |
Lastly, the denyUser action which will check if the error is a 4xx type error and return an object where with the ok field set to false and the destination set to the login page
| |
Passport.js will do its thing, and will be able to appropriately redirect a user when they successfully login. This concludes this little sidequest into the backend, we can go back to the frontend and continue working on our Register module.
The fourth function and final function will redirect the user to the appropriate page. We will use the destination that is returned from the passportCheck() step. If the verification is successful, this destination would be the dashboard route
| |
We’ve added quite a lot of new config to our app, so we should restart our server. Now if we test this out in the browser now, we should see a popup dialogue that will allow us to use an authenticator to create a passkey for our new user.
Logout
The logout process is pretty straightforward and is mostly identical to web applications that use regular password authentication.
We can start by adding a new route
| |
Our new logout route is calling an auth controller action that does not exist yet. So let’s open up the AuthController and add the auth.logout action. If there is an error, we will just use the next() middleware to call the next middleware function in the stack. But if there are no errors, we will redirect the user to the root route
| |
Now is we head into the browser and hit the logout button, we should be taken back to the root route.
Phase 2: Assertion (using the passkey)
Now that we can register a new user and also log them out, let’s work on the remaining phase of the process, which is to authenticate the user with the passkey we created. As a reminder, this phase is called the assertion phase, which can be thought of as the user login. Instead of a user keying in their password, they will use their passkey for authentication.
To use a passkey, a few things need to happen between the client, the authenticator and the relying party. The following is a brief summary of the 3 main steps in the process
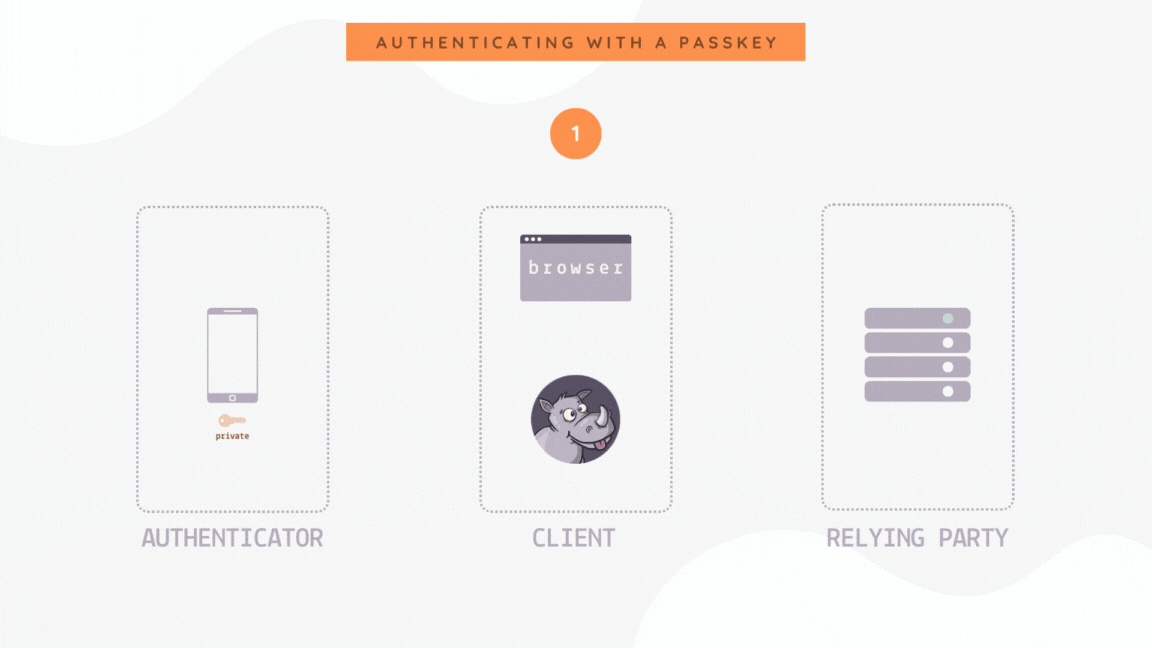
The
usersubmits the sign in form, prompting the client to request a new randomchallengefrom the relying party. This first step is more or less the same as the first step of theattestationphase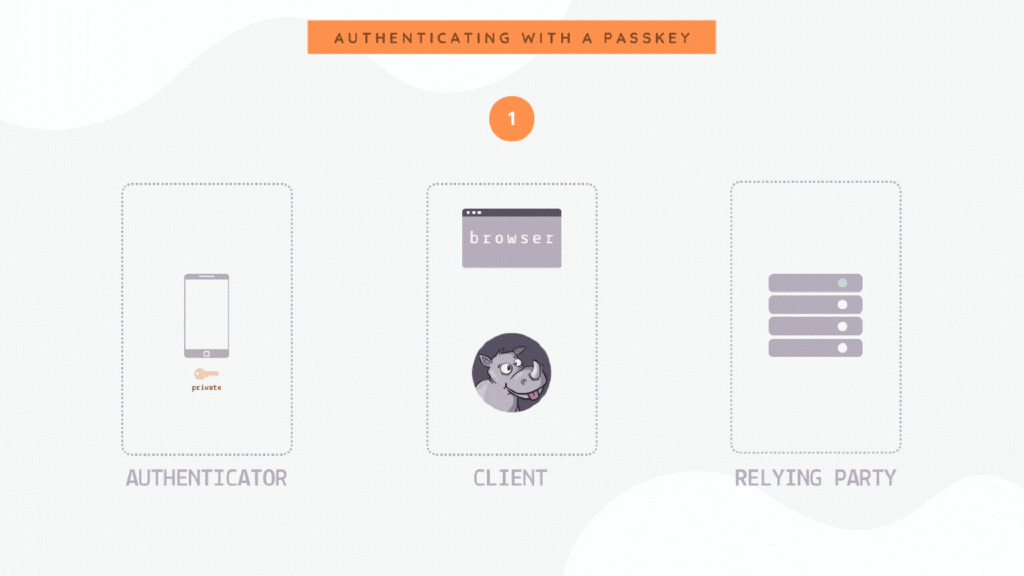
Image: phase-2-step-1 The
clientcallsnavigator.credentials.get(challenge)method, passing in thechallengethat was received. Thenavigator.credentials.get()is another method made available to us by the Web Authentication API. This will prompt theauthenticatorto request verification from theuservia thumbprint. Theprivatekey that is stored on theauthenticatoris used to sign thechallenge. Thesigned challenge, thecredential id, andusernameare sent back to client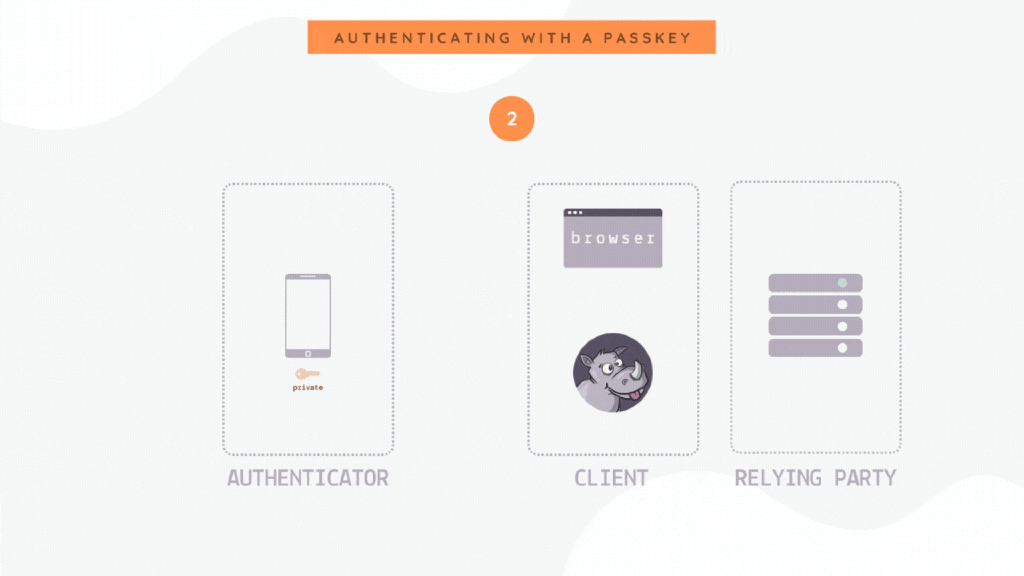
Image: phase-2-step-2 The
clientthen sends thesigned challenge,credential id, andusernameonwards to therelying party(server). The server verifies the signed challenge with thepublickey from the database. If the verification is successful, the server will find the correct user in the database and log them into our application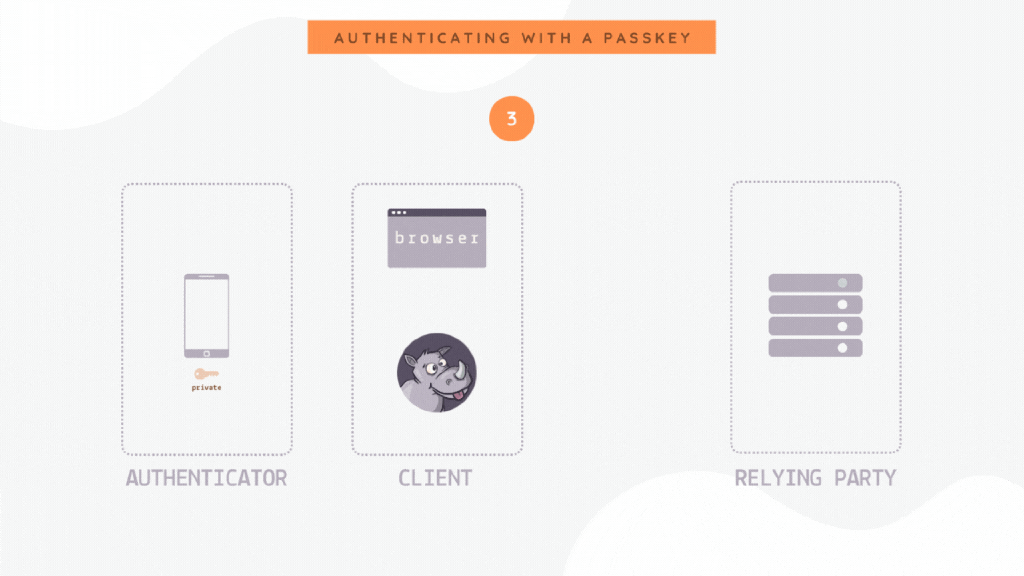
Image: phase-2-step-3


Now that we have gone over the flow we want to achieve, let’s start working on the code. We will try to mirror the process we just went through in the overview, above.
Starting with the login form. If we take a look at the register view file, we can see that we have already imported the the assertion-login.js script file into the login view. This file will contain code that will allow us to submit the login form. This file does not exist yet, so we will create it soon. We are also importing the base64url package too. We previously created this file in phase 1
| |
Now we can create the script file in the /public folder to organise our assertion/login code
| |
Inside the assertion-login.js file, we can start creating our Login module. It will just have an init method for now. Then we will add some code that will listen for the window object to load before it creates a new instance of our Login class. We will only init the login instance if the user agent supports the PublicKeyCredential interface
| |
We’ve listed out 5 functions we will need in order to complete our Login module. The middle 3 correspond to the steps we discussed in the overview for phase 2. But steps 1 and 5 are additional steps for a nicer user experience.
The first function we need to implement will check if the User Agent supports conditional mediation. If conditional mediation is available, the browser can show any available passkeys to the user in a dialog box. If conditional medication is not supported, we will return early and the rest of the login code will not be run
| |
This is a sneak peek of what the dialog box would look like in Chrome once it is implemented.

The second function will get fetch a random challenge from the server by using the fetch API to make a request to the /login/public-key/challenge endpoint. We will store this challenge in a variable and pass it onto the next function
| |
The /login/public-key/challenge route does not exist yet so lets switch over to our routes file on the server side and create it now. This route will work exactly like the route we created in the attestation phase. But for the purposes of simplicity, we will duplicate the functionality again for our login phase
| |
Our new route calls an auth controller action named getChallengeFrom(), which does not exist yet. So let’s head into the AuthController file so we can create it. We will use the store to generate a new challenge. The store is the instance of SessionChallengeStore that we pass through from our routes file. If there is an error, we will just use the next() middleware to call the next middleware function in the stack. But if there are no errors, will send back a JSON response object that contains a randomly generated challenge.
| |
And that’s it for the backend parts of the login phase. We can return to the assertion-login.js file and forge ahead.
The third function will use the navigator.credentials.get() method to prompt the authenticator to seek verification from the user in the form of a thumbprint or something similar. The authenticator will also use the stored private key to sign the challenge we pass to it. Within the options, we have indicated that we will use conditional mediation and our credentials are of the type publicKey. The publicKey option tells the user agent to use an existing set of public key credentials to authenticate to a relying party
| |
The fourth function will allow the user to loginWith(credentials). This looks a little long, but all we are doing is putting together some login options that the relying party needs to verify the user. In the overview, we mentioned that during this step, we will send over the credential id, signed challenge and username. Along with those bits of information, we will also send some information about the authenticator and the client. These options are sent via the fetch API to the /login/public-key endpoint
| |
For our fifth and final function, we will use the destination from our passportCheck() step and redirect the user to the appropriate page. If the verification is successful, this page would be the dashboard. Again this function is more or less identical to the redirect function in phase 1, but we have duplicated it here for simplicity
| |
With those five functions, we have successfully implemented the Login module. We can now restart our server and log in with our passkey.
Conclusion
And there you have it. In this tutorial we built an Expressjs app using passkeys to learn more about the Web Authentication API (a.k.a. Webauthn). We also used docker during local development so we could easily set up a Postgres service for our app. The finished code for this project can be found in the Github repository.
Going further
At the beginning of the article, we went over the scope of the tutorial and listed out the areas we would not be covering. If you’d like to challenge yourself to take this project further, you can consider adding
- better session security
- a deployment step
- CI/CD pipeline
- error handling, and
- form data validation
Congratulations, you did great! Keep learning and keep coding. Bye for now, <3